This document describes the Requirements and Installation Scripts that can be defined to check if a component can be installed on the machine or a specific volume and which scripts shall be run before and after the installation of the files of the component.
Finally, this document describes how to add resources, for instance used by an Installation Script, in a component.
Managing Installation RequirementsBy default, when you install a component, it can be installed on any Macintosh running Mac OS X and on any of its partitions (as long as the option Root Volume Only is not enabled).
Installation Requirements can be used to decide if a component can be installed with the currently running operating system and installed applications or on which partition.
There are two possible levels for a Requirement:
|

To add an installation requirement:
| 1 | Select the component in the Packages & Metapackages list. |
| 2 | Choose View > Scripts. |
| 3 | Click Add… in the Requirements section. |
| 4 | Configure the Requirement. |
| 5 | Click OK. |
To edit an installation requirement:
| 1 | Select the component in the Packages & Metapackages list. |
| 2 | Choose View > Scripts. |
| 3 | Select the Requirement in the list. |
| 4 | Click Edit… in the Requirements section. |
| 5 | Modify the Requirement. |
| 6 | Click OK. |
To remove an installation requirement:
| 1 | Select the component in the Packages & Metapackages list. |
| 2 | Choose View > Scripts. |
| 3 | Select the Requirements to be removed. |
| 4 | Click Remove… in the Requirements section. |
| 5 | Click Remove. |
To enable or disable an Installation Requirement:
| 1 | Select the component in the Packages & Metapackages list. |
| 2 | Choose View > Scripts. |
| 3 | Select the Requirement. |
| 4 | Select or unselect the checkbox in the MemberShip (•) column. |
To change the level of an installation requirement:
| 1 | Select the component in the Packages & Metapackages list. |
| 2 | Choose View > Scripts. |
| 3 | Select the Requirement. |
| 4 | Choose the level from the pop-up menu in the Level column. |
There are two kinds of Requirement. Those evaluated at the very beginning of the installation and which decide whether the installation is allowed on the current operating system or not. And those evaluated during the Select Destination step and which decide whether the installation can be performed or not on a specific available partition.
Here is the description of Requirements supported by Iceberg:
|
A Requirement is defined by the following items:

To add a package requirement:
| 1 | Select the metapackage in the Packages & Metapackages list. |
| 2 | Choose View > Scripts. |
| 3 | Click Add… in the Requirements section. |
| 4 | Type the label of the Requirement in the Label text field. |
| 5 | Choose the level from the Level pop-up menu. |
| 6 | Choose Package from the pop-up menu in the upper left corner of the Specificaiton section. |
| 7 | Type the Bundle Identifier (CFBundleIdentifier) of the package in the Bundle Identifier text field. |
| 8 | Choose the Info.plist file key from the key pop-up menu. |
| 9 | Choose the comparator method from the comparator pop-up menu. |
| 10 | Type the comparison value in the text field in the lower right corner of the Specification section. |
| 11 | Type the title of the alert in the Title text field. |
| 12 | Type the message of the alert in the Message text field. |
| 13 | Click OK. |
To add a sysctl requirement:
| 1 | Select the component in the Packages & Metapackages list. | ||
| 2 | Choose View > Scripts. | ||
| 3 | Click Add… in the Requirements section. | ||
| 4 | Type the label of the Requirement in the Label text field. | ||
| 5 | Choose the level from the Level pop-up menu. | ||
| 6 | Choose sysctl from the pop-up menu in the upper left corner of the Specificaiton section. | ||
| 7 | Type the sysctl identifier or choose one from the pop-up menu.
| ||
| 8 | Choose the comparator method from the comparator pop-up menu. | ||
| 9 | Type the comparison value in the text field in the lower right corner of the Specification section. | ||
| 10 | Type the title of the alert in the Title text field. | ||
| 11 | Type the message of the alert in the Message text field. | ||
| 12 | Click OK. |
To add a bundle requirement:
| 1 | Select the component in the Packages & Metapackages list. |
| 2 | Choose View > Scripts. |
| 3 | Click Add… in the Requirements section. |
| 4 | Type the label of the Requirement in the Label text field. |
| 5 | Choose the level from the Level pop-up menu. |
| 6 | Choose Bundle from the pop-up menu in the upper left corner of the Specificaiton section. |
| 7 | Choose "doesn't exist" from the location pop-up menu to check for the absence of the bundle or "located" to check the value for a key of the bundle Info.plist file. |
| 8 | Type the absolute path name to the bundle in the location texte field and go to step 12 if you have chosen "doesn't exist". |
| 9 | Choose the Info.plist key in the key pop-up menu. |
| 10 | Choose the comparator method from the comparator pop-up menu. |
| 11 | Type the comparison value in the text field in the lower right corner of the Specification section. |
| 12 | Type the title of the alert in the Title text field. |
| 13 | Type the message of the alert in the Message text field. |
| 14 | Click OK. |
To add a file requirement:
| 1 | Select the component in the Packages & Metapackages list. |
| 2 | Choose View > Scripts. |
| 3 | Click Add… in the Requirements section. |
| 4 | Type the label of the Requirement in the Label text field. |
| 5 | Choose the level from the Level pop-up menu. |
| 6 | Choose File from the pop-up menu in the upper left corner of the Specificaiton section. |
| 7 | Choose "doesn't exist" from the location pop-up menu to check for the absence of the file or "located" to check an attribute of the file. |
| 8 | Type the absolute path name to the file in the location text field and go to step 12 if you have chosen "doesn't exist". |
| 9 | Choose the file attribute from the attribute pop-up menu. |
| 10 | Choose the comparator method from the comparator pop-up menu. |
| 11 | Type the comparison value in the text field in the lower right corner of the Specification section. |
| 12 | Type the title of the alert in the Title text field. |
| 13 | Type the message of the alert in the Message text field. |
| 14 | Click OK. |
To add a property list requirement:
| 1 | Select the component in the Packages & Metapackages list. |
| 2 | Choose View > Scripts. |
| 3 | Click Add… in the Requirements section. |
| 4 | Type the label of the Requirement in the Label text field. |
| 5 | Choose the level from the Level pop-up menu. |
| 6 | Choose Property List from the pop-up menu in the upper left corner of the Specificaiton section. |
| 8 | Type the absolute path name to the Property List in the location text field |
| 9 | Choose the value kind from the type po-up menu. |
| 10 | Choose the Property List key from the key pop-up menu. |
| 10 | Choose the comparator method from the comparator pop-up menu. |
| 11 | Type the comparison value in the text field in the lower right corner of the Specification section. |
| 12 | Type the title of the alert in the Title text field. |
| 13 | Type the message of the alert in the Message text field. |
| 14 | Click OK. |
To add an alert localization:
| 1 | Select the component in the Packages & Metapackages list. |
| 2 | Choose View > Scripts. |
| 3 | Select the requirement in the Requirements list. |
| 4 | Click Edit… in the Requirements section. |
| 5 | Choose Add Localization… from the localization pop-up menu. |
| 6 | TYpe the name of the localization and click Add. |
| 7 | Type the localized title of the alert in the Title text field. |
| 8 | Type the localized message of the alert in the Message text field. |
| 9 | Click OK. |
To change an alert localization:
| 1 | Select the component in the Packages & Metapackages list. |
| 2 | Choose View > Scripts. |
| 3 | Select the requirement in the Requirements list. |
| 4 | Click Edit… in the Requirements section. |
| 5 | Choose the localization from the localization pop-up menu. |
| 6 | Change the alert title or message. |
| 7 | Click OK. |
To remove an alert localization:
| 1 | Select the component in the Packages & Metapackages list. |
| 2 | Choose View > Scripts. |
| 3 | Select the requirement in the Requirements list. |
| 4 | Click Edit… in the Requirements section. |
| 5 | Choose the localization to be removed from the localization pop-up menu. |
| 6 | Choose Remove… from the localization pop-up menu. |
| 7 | Click Remove. |
| 8 | Click OK. |
By default, when a component is installed, no tasks is peformed before or after the installation. If needed, you can define scripts (for instance
shell or perl scripts) that will be executed before or after the installation.
You can define six types of scripts:
|
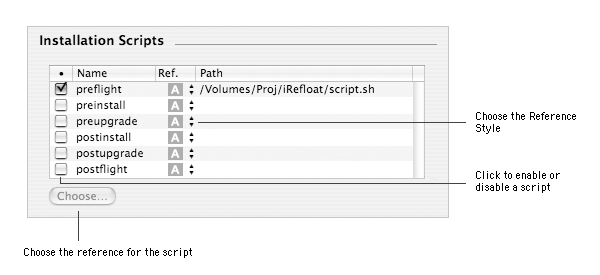
To add an installation script:
| 1 | Select the component in the Packages & Metapackages list. | ||
| 2 | Choose View > Scripts. | ||
| 3 | Select the type of script you wish to add in the Installation Scripts list. | ||
| 4 | Click Choose… in the Installation Scripts section. | ||
| 5 | Select the file you want to use for this script and click Choose.
| ||
| 6 | Select the checkbox of the selected script in the Membership (•) column. |
To enable or disable an installation script:
| 1 | Select the component in the Packages & Metapackages list. |
| 2 | Choose View > Scripts. |
| 3 | Select the Installation Script. |
| 4 | Select or unselect the checkbox in the Membership (•) column. |
If you wish to use an InstallationCheck or VolumeCheck or one of the Installation Scripts requires additional files, you can add these using the Additional Resources list. By default, they will be added into the Resources folder of the component. If you need it, you can create localized Additional Resources.
|

To add an additional resource:
| 1 | Select the component in the Packages & Metapackages list. | ||
| 2 | Choose View > Scripts. | ||
| 4 | Click Add… in the Additional Resources section. | ||
| 5 | Select the items you want to add and click on Add..
|
To remove an additional ressource:
| 1 | Select the component in the Packages & Metapackages list. | ||
| 2 | Choose View > Scripts. | ||
| 2 | Select the items you want to remove from the list of Additional Resources. | ||
| 4 | Click Remove… in the Additional Resources section. | ||
| 5 | Click Remove.
|
To enable or disable an additional resource:
| 1 | Select the component in the Packages & Metapackages list. |
| 2 | Choose View > Scripts. |
| 2 | Select the item in the Additional Resources list. |
| 4 | Select or unselect the checkbox in the Membership column. |
To add a Resources localization:
| 1 | Select the component in the Packages & Metapackages list. |
| 2 | Choose View > Scripts. |
| 3 | Choose Add Localization… from the localization pop-up menu. |
| 4 | Type the localization name and click Add. |
To remove a Resources localization:
| 1 | Select the component in the Packages & Metapackages list. | ||
| 2 | Choose View > Scripts. | ||
| 3 | Choose the localization from the localization pop-up menu. | ||
| 4 | Choose Remove… from the localization pop-up menu. | ||
| 5 | Click Remove.
|